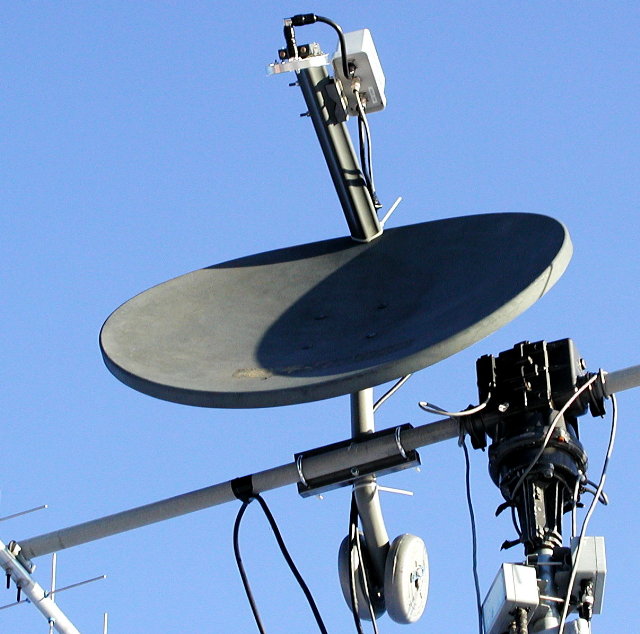
OSCAR 40 (AO40) 2.4 GHz Antenna The amateur radio 2.4 GHz satellite antenna pictured above, was created using an old, discarded PrimeStar TV antenna. It was covering a pile of firewood for years, and covered with dirt and leaves. Modifications to the antenna are very simple. First, you need to remove the "Low Noise Block" (LNB), which is a small circular/tube device bolted at the focal point of the antenna. This part, used to tune in commercial satellite TV images, can be discarded.
The next challenge is to replace the LNB with a feed antenna for 2.4 GHz. My choice was to use a "patch feed ", manufactured by G3RUH, James Miller, of the UK. This feed antenna costs approximately $150, is extremely sensitive, and circularly polarized, which is a necessity for satellite work. You can use a helix antenna feed , which can be constructed for just a few dollars.
Having removed the LNB, the next step is to replace it with the patch feed. For this particular PrimeStar dish, all you need to do with the G3RUH patch feed is to use two small strips of "plumber's tape" to attach it to the feed arm. Small holes are predrilled in the patch feed, and mounting bolts are already in place on the feed arm. Alignment of the patch feed is fairly simple - I just "eyeballed" it, ensuring it was perpendicular to the feed arm, and aimed squarely at the dish. The back of the patch feed should be approximately 1/4 inch from the feed arm. Alignment seems to be comparatively easy - mine worked great the first time I tried it!
To attach the dish to the mast , I removed all mounting items on the back of the dish and used two small strips of aluminum "L" brackets to bolt to the dish, and allow me to bolt a support to the brackets. The support I used came from an old 18 inch DirecTv dish antenna. I simply bolted the bracket to the support. The support must then be bolted to the mast. I drilled two holes through the support so I could bolt two lengths of one inch square tubing to the support. These lengths of square tubing are then bolted to the mast, providing a very rigid installation. The torque from wind loading on a dish this size can be pretty heavy - you don't want it to slip around.
Attaching the 2.4 GHz to 144 MHz downconverter was easy - I just drilled two holes through the feed arm and used the U-bolt provided with the downconverter (mine is a UEK-3000, available from SSB Electronics ) to attach it to the feed arm. A very short section of 9813 coaxial cable, with N-connectors on both ends, is attached between the downconverter and the patch feed. Connect the coax carrying the output signal from the downconverter to your 144 MHz receiver, and a DC power supply source - mine runs through a length of coaxial cable. Some downconverters can be fed a DC supply source through the same coax used to bring the signal into your shack. The UEK-3000 will do that - I already had a 12 VDC cable at the antenna, so I elected to use it.
A final touch necessary to ease the life of your antenna rotator, is to add a counterbalance at the end of the support. I finally found some use for the weight set that I had bought years ago, intending to put to use to improve my physical conditioning. After having set in the garage for years, I thought that they could better serve me as a counterbalance - and they did! I drilled a hole through the support tube, then used an 8 inch long bolt to hold the two weights on - a total of about 10 pounds.
The dish is then ready to be mounted to the mast. Be sure to mount the dish UPSIDE DOWN . The PrimeStar dish (and most other digital satellite TV antennas on the commercial market) is an "offset feed" antenna, meaning that when aimed normally at the horizon, it is actually looking "up" at an angle of about 22.5 degrees. By inverting it, it will allow you to aim it at the horizon so it will pick up signals at low angles when the satellite comes up over your location. You must mount the dish at an angle when you put it on the mast so that it appears to be looking "up" at about a 22.5 degree angle. When mounted like this, the signal it "sees" will parallel your uplink antenna so that they both are looking at the same point in the sky - the satellite.
That's all there is to it. Fire up your transceiver and go have fun on the satellite!